Lawyers redline contracts in Microsoft Word daily. But how do they do it, and is it efficient? Find out in this guide.
Microsoft Word has been the default currency for contracts for decades. Any lawyer that’s ever pushed a contract through revisions will have redlined in Word - or at least tried to.
But familiarity doesn’t get contracts negotiated faster, efficiency does. And there are certainly more efficient ways to redline contracts in 2024.
This Juro guide explains how to redline a Word document, and how you can make your current redlining process better.
What is redlining in Word?
Redlining in Microsoft Word is a feature that enables users to remove, add or edit text within a Word document, with the changes marked up in red.
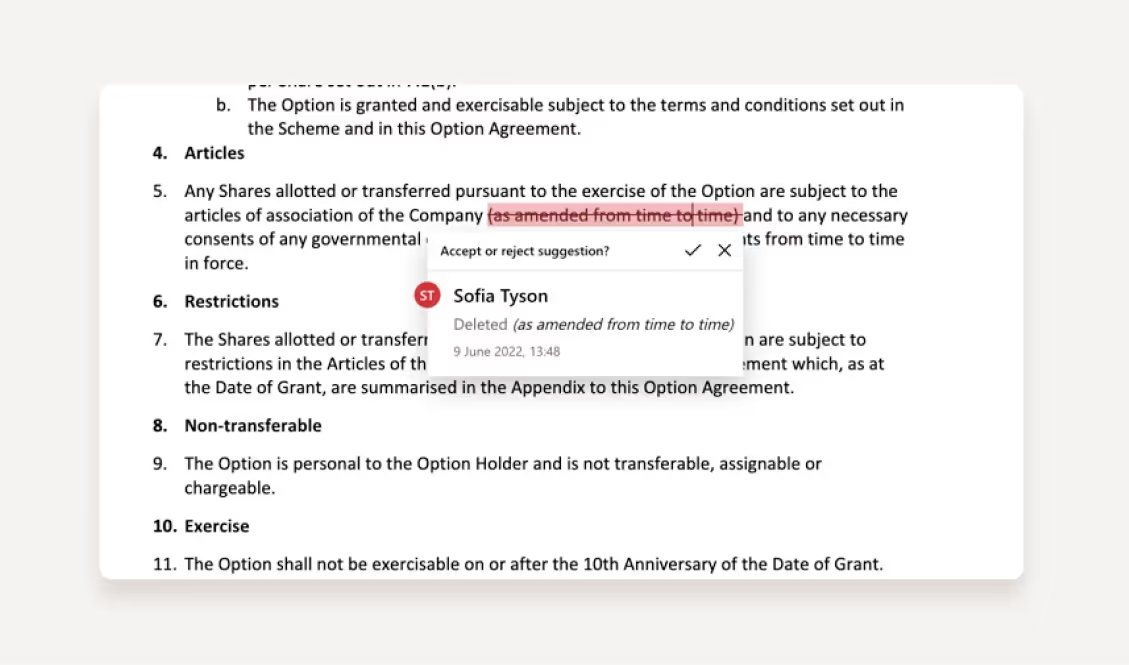
When users choose to delete text within the document, the feature adds a red strike through all of the deleted words. If users decide to add words to the document, this red line will appear under the new text to indicate that it’s been suggested.
Each redline will then also connect the suggestions made to a specific individual, making it easy to see who has proposed which changes and when.
The purpose of redlining in Word is to make any adjustments and edits visible to all parties, and to enable users to propose changes directly within a file without making irreversible changes to the existing content.
This makes adding redlines in Microsoft Word a popular choice for legal teams managing contracts, as the redline feature allows contract owners to propose these amendments during the contract review and negotiation phases.
But just because it's a popular way to negotiate agreements, that doesn't mean it's the most efficient way. As you'll find out in this post, redlining in Word can cause friction for teams.
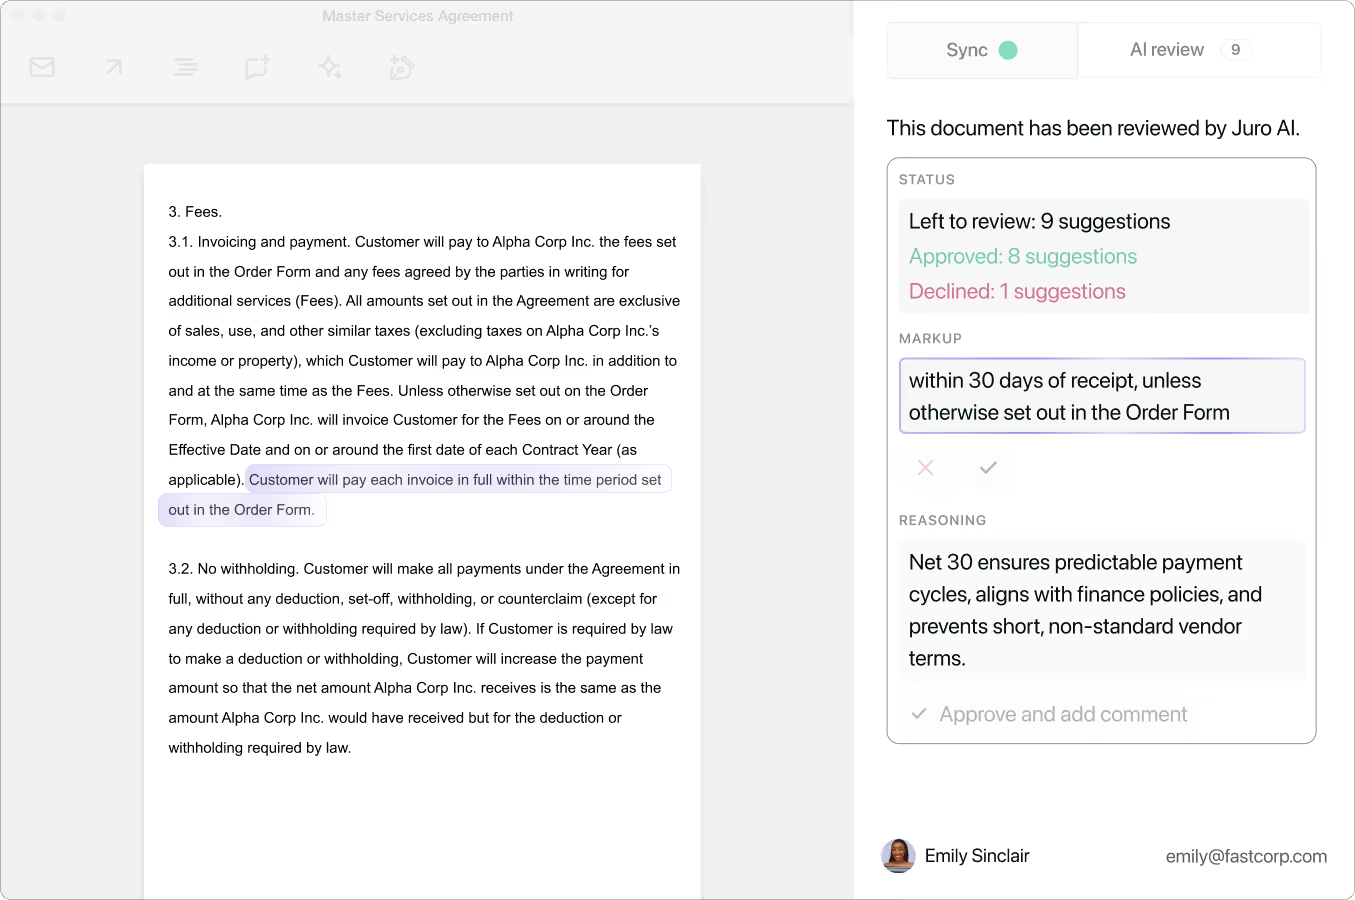
If you're familiar with this friction and want a more efficient way to redline your contracts, check out Juro. Juro's collaborative contract automation software offers in-browser redlining, threaded comments and intuitive version control.
To find out more, hit the button below. Otherwise, read on to find out how to redline contracts in Word.
There are two ways to redline in Word: manually or by using track changes.
How to redline in Word manually
Firstly, users can redline in Word manually. This is a more tedious process than using track changes, but it gets the job done.
Open the file that you wish to redline and select the specific part of the document where you’d like to add or remove text from.
Click on the ‘Home’ tab which can be found at the top of the page. This will present you with a toolbar of editing and text formatting options.
Once you have found the ‘Font’ section of the toolbar, select the icon that has the letters A, B and C striked through.
Highlight the text that you’re suggesting to remove and click on the ‘Strikethrough’ button. This will put a line through any of the text highlighted without completely deleting it from the document. This is useful since it provides visibility around what is being deleted before it has been fully removed.
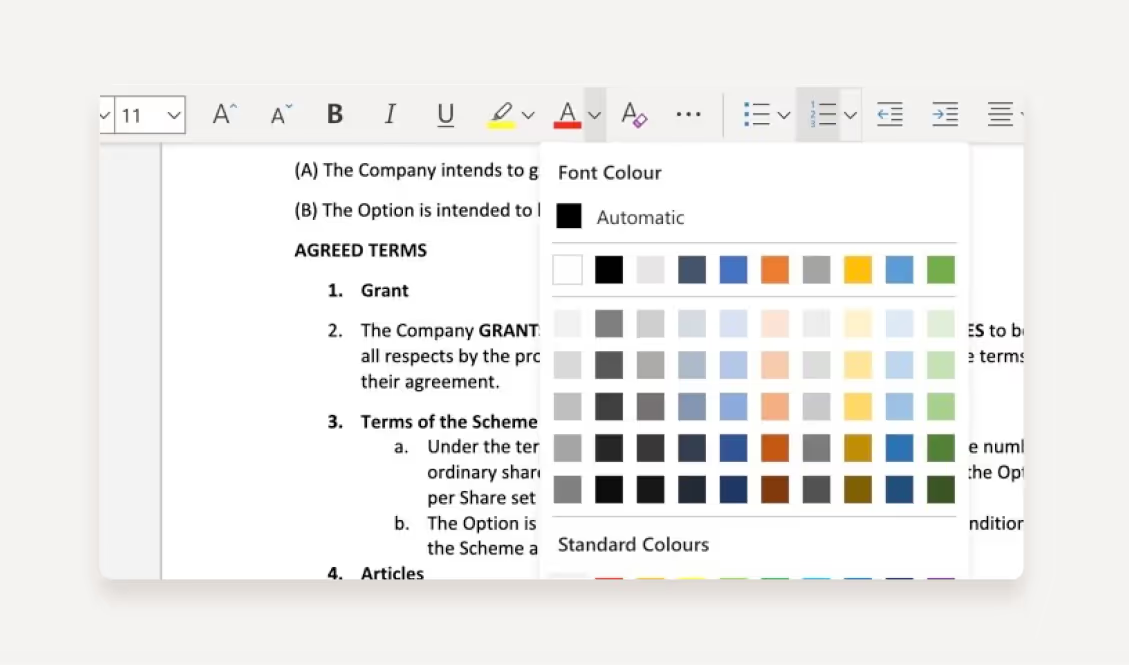
To add text in a red font, select the ‘Font color’ section of the ‘Font’ toolbar instead. This will be presented as a button containing an ‘A’ with a straight line beneath it.
Click the arrow beside the button to see all of the colour options available. From here, select one of the red shades and start adding your changes by typing in the red coloured font. This will distinguish the existing text (which is in black) from the new recommended text (which will be in red).
How to redline in Word using track changes
The slightly more intuitive way to add redlines in Word is by using the software’s track changes feature. This works in the following way:
Open up the document or contract that you want to add redlines to in Word.
This time, select the ‘Review’ section of the toolbar at the top of the page, and then click on the Track Changes icon. This may appear differently depending on the version of Microsoft you have, but in the most recent version it will look like a piece of annotated paper with a pencil over the top of it and a folded corner.
Next, set the markup settings to ‘All Markup’. This will show you any text that you add or remove in red and will connect the change with a comment bubble in the right-hand margin. This section allows you to add an explanation and makes the changes traceable.
Once track changes have been enabled you can go ahead with making any amendments to the contract or document you like.
How to accept redline changes in Word
If you’re on the receiving end of track changes, you’ll also need to know how to accept or reject redlines in Word. Fortunately, it’s relatively easy.
In the toolbar at the top of the screen you will see four buttons in the ‘Changes’ section: ‘Accept’, ‘Reject’, ‘Previous’, and ‘Next’.
To move between track changes on the document, select either ‘Previous’ or ‘Next’, depending on where the changes are. This will enable you to accept and reject individual edits, rather than having to approve or reject the entire document’s edits.
To reject an edit, simply select ‘Reject’ when that specific change is highlighted. If you reject an edit then the proposed changes will disappear and that part of the document will revert back to its original form.
To accept an edit, click ‘Accept’ instead. If you accept the edit then the proposed changes will take effect.
Advantages of redlining in Word
Adding redlines in Word does have some advantages, particularly for editing ordinary documents. However, when it comes to redlining a contract in Word, there are only a few benefits of doing so. These are listed below.
1. Lawyers are experienced using Word
Not only is Microsoft Word where most contracts are created, but it’s also the platform that legal teams are most experienced using. This makes it a natural choice for lawyers that opt for familiarity, albeit at the expense of efficiency.
2. No more pen and paper
Redlines in Word are an inherent improvement on the way contracts were traditionally negotiated. Redlining contracts digitally through Microsoft Word is far easier than adding edits onto paper using red ink.
Redlines in Word can be traced back to certain individuals and contracts can be negotiated without needing to be present in-person. This is similar to the advantage of using electronic signatures instead of wet signatures.
But does that mean that redlining in Word is perfect? Not really…
Disadvantages of redlining in Word
Unfortunately, there are more cons of adding a redline in Word than there are pros. These include the ones listed below.
1. Not collaborative enough
What if you want to do more than just add redlines to contracts? What if you want to hide certain comments from counterparties, or control who can edit which elements of the contract?
The truth is, Word simply doesn’t offer the advanced functionality parties need to collaborate effectively on agreements. There are workarounds, but these are often more hassle than they’re worth.
After all, Microsoft Word wasn’t built with complex contract negotiations in mind. But contract tools like Juro were.
2. Not secure enough
Another important drawback of adding redlines in Word is that they aren’t as secure as they would be in other platforms.
The biggest risk is that counterparties can bypass document protection by copying and pasting a controlled document into another Word document version and editing in that instead.
This isn’t possible in more secure platforms like Juro, so you can trust that you have full control over contract versions at all times.
3. Version control becomes a nightmare
Although legal and business teams rely on Microsoft Word for both the drafting and redlining phases of the contract lifecycle, that doesn’t make version control any easier. Microsoft Word users still need to download and share copies of the Word document with counterparties. This means creating multiple versions of the same contract, each littered with different edits.
With multiple versions of the document floating around it can quickly become difficult to track which changes have been made and when. This creates risk within your contracts.
4. Loss of valuable contract data
One of the biggest drawbacks of redlining in Word is that it results in a loss of contract data. Distinct from Juro where contract data is captured automatically using smartfields, Word doesn’t capture the data contained within contracts, as it only manages static files.
Instead, users have to manually extract all of the data from negotiated and redlined contracts and input this into an excel spreadsheet if they wish to track it. This is time-consuming and prone to errors.
Is there a better way to negotiate contracts?
Fortunately, the days when redlining in Word was your only option are now over. There are plenty of redlining tools on the market now, and they’re designed specifically for managing contracts.
Take Juro for example. Juro is an all-in-one contract automation software that excels in contract collaboration.
Juro enables legal and business teams to add internal comments and hide these from counterparties. This means that you can make suggestions and edits that are only visible to your internal team to review.
Juro users can also add external comments when negotiating with counterparties, too. This means that you can tag elements within the contract with comments and discuss your position with counterparties using comment threads.
Unlike Microsoft Word, Juro also offers sophisticated contract approval workflows to make sure high-risk edits don't slip past the relevant stakeholders. These approval workflows can be set based on the values in a contract, or as a sequence of approvers.
Best of all, all of the edits and changes made to a contract are captured in a secure, tamper-proof audit trail. This makes it easy to identify which changes were made to a contract, and when.
Want to upgrade your redlining workflow with Juro? Fill in the form below to find out more.
Liked what you read? Stay in touch for all the latest insights.
Thank you! Your submission has been received!
Oops! Something went wrong while submitting the form.
To learn more about the use of your personal data, please consult our readable Privacy Policy
Lawyers redline contracts in Microsoft Word daily. But how do they do it, and is it efficient? Find out in this guide.
Microsoft Word has been the default currency for contracts for decades. Any lawyer that’s ever pushed a contract through revisions will have redlined in Word - or at least tried to.
But familiarity doesn’t get contracts negotiated faster, efficiency does. And there are certainly more efficient ways to redline contracts in 2024.
This Juro guide explains how to redline a Word document, and how you can make your current redlining process better.
What is redlining in Word?
Redlining in Microsoft Word is a feature that enables users to remove, add or edit text within a Word document, with the changes marked up in red.
When users choose to delete text within the document, the feature adds a red strike through all of the deleted words. If users decide to add words to the document, this red line will appear under the new text to indicate that it’s been suggested.
Each redline will then also connect the suggestions made to a specific individual, making it easy to see who has proposed which changes and when.
The purpose of redlining in Word is to make any adjustments and edits visible to all parties, and to enable users to propose changes directly within a file without making irreversible changes to the existing content.
This makes adding redlines in Microsoft Word a popular choice for legal teams managing contracts, as the redline feature allows contract owners to propose these amendments during the contract review and negotiation phases.
But just because it's a popular way to negotiate agreements, that doesn't mean it's the most efficient way. As you'll find out in this post, redlining in Word can cause friction for teams.
If you're familiar with this friction and want a more efficient way to redline your contracts, check out Juro. Juro's collaborative contract automation software offers in-browser redlining, threaded comments and intuitive version control.
To find out more, hit the button below. Otherwise, read on to find out how to redline contracts in Word.
There are two ways to redline in Word: manually or by using track changes.
How to redline in Word manually
Firstly, users can redline in Word manually. This is a more tedious process than using track changes, but it gets the job done.
Open the file that you wish to redline and select the specific part of the document where you’d like to add or remove text from.
Click on the ‘Home’ tab which can be found at the top of the page. This will present you with a toolbar of editing and text formatting options.
Once you have found the ‘Font’ section of the toolbar, select the icon that has the letters A, B and C striked through.
Highlight the text that you’re suggesting to remove and click on the ‘Strikethrough’ button. This will put a line through any of the text highlighted without completely deleting it from the document. This is useful since it provides visibility around what is being deleted before it has been fully removed.
To add text in a red font, select the ‘Font color’ section of the ‘Font’ toolbar instead. This will be presented as a button containing an ‘A’ with a straight line beneath it.
Click the arrow beside the button to see all of the colour options available. From here, select one of the red shades and start adding your changes by typing in the red coloured font. This will distinguish the existing text (which is in black) from the new recommended text (which will be in red).
How to redline in Word using track changes
The slightly more intuitive way to add redlines in Word is by using the software’s track changes feature. This works in the following way:
Open up the document or contract that you want to add redlines to in Word.
This time, select the ‘Review’ section of the toolbar at the top of the page, and then click on the Track Changes icon. This may appear differently depending on the version of Microsoft you have, but in the most recent version it will look like a piece of annotated paper with a pencil over the top of it and a folded corner.
Next, set the markup settings to ‘All Markup’. This will show you any text that you add or remove in red and will connect the change with a comment bubble in the right-hand margin. This section allows you to add an explanation and makes the changes traceable.
Once track changes have been enabled you can go ahead with making any amendments to the contract or document you like.
How to accept redline changes in Word
If you’re on the receiving end of track changes, you’ll also need to know how to accept or reject redlines in Word. Fortunately, it’s relatively easy.
In the toolbar at the top of the screen you will see four buttons in the ‘Changes’ section: ‘Accept’, ‘Reject’, ‘Previous’, and ‘Next’.
To move between track changes on the document, select either ‘Previous’ or ‘Next’, depending on where the changes are. This will enable you to accept and reject individual edits, rather than having to approve or reject the entire document’s edits.
To reject an edit, simply select ‘Reject’ when that specific change is highlighted. If you reject an edit then the proposed changes will disappear and that part of the document will revert back to its original form.
To accept an edit, click ‘Accept’ instead. If you accept the edit then the proposed changes will take effect.
Advantages of redlining in Word
Adding redlines in Word does have some advantages, particularly for editing ordinary documents. However, when it comes to redlining a contract in Word, there are only a few benefits of doing so. These are listed below.
1. Lawyers are experienced using Word
Not only is Microsoft Word where most contracts are created, but it’s also the platform that legal teams are most experienced using. This makes it a natural choice for lawyers that opt for familiarity, albeit at the expense of efficiency.
2. No more pen and paper
Redlines in Word are an inherent improvement on the way contracts were traditionally negotiated. Redlining contracts digitally through Microsoft Word is far easier than adding edits onto paper using red ink.
Redlines in Word can be traced back to certain individuals and contracts can be negotiated without needing to be present in-person. This is similar to the advantage of using electronic signatures instead of wet signatures.
But does that mean that redlining in Word is perfect? Not really…
Disadvantages of redlining in Word
Unfortunately, there are more cons of adding a redline in Word than there are pros. These include the ones listed below.
1. Not collaborative enough
What if you want to do more than just add redlines to contracts? What if you want to hide certain comments from counterparties, or control who can edit which elements of the contract?
The truth is, Word simply doesn’t offer the advanced functionality parties need to collaborate effectively on agreements. There are workarounds, but these are often more hassle than they’re worth.
After all, Microsoft Word wasn’t built with complex contract negotiations in mind. But contract tools like Juro were.
2. Not secure enough
Another important drawback of adding redlines in Word is that they aren’t as secure as they would be in other platforms.
The biggest risk is that counterparties can bypass document protection by copying and pasting a controlled document into another Word document version and editing in that instead.
This isn’t possible in more secure platforms like Juro, so you can trust that you have full control over contract versions at all times.
3. Version control becomes a nightmare
Although legal and business teams rely on Microsoft Word for both the drafting and redlining phases of the contract lifecycle, that doesn’t make version control any easier. Microsoft Word users still need to download and share copies of the Word document with counterparties. This means creating multiple versions of the same contract, each littered with different edits.
With multiple versions of the document floating around it can quickly become difficult to track which changes have been made and when. This creates risk within your contracts.
4. Loss of valuable contract data
One of the biggest drawbacks of redlining in Word is that it results in a loss of contract data. Distinct from Juro where contract data is captured automatically using smartfields, Word doesn’t capture the data contained within contracts, as it only manages static files.
Instead, users have to manually extract all of the data from negotiated and redlined contracts and input this into an excel spreadsheet if they wish to track it. This is time-consuming and prone to errors.
Is there a better way to negotiate contracts?
Fortunately, the days when redlining in Word was your only option are now over. There are plenty of redlining tools on the market now, and they’re designed specifically for managing contracts.
Take Juro for example. Juro is an all-in-one contract automation software that excels in contract collaboration.
Juro enables legal and business teams to add internal comments and hide these from counterparties. This means that you can make suggestions and edits that are only visible to your internal team to review.
Juro users can also add external comments when negotiating with counterparties, too. This means that you can tag elements within the contract with comments and discuss your position with counterparties using comment threads.
Unlike Microsoft Word, Juro also offers sophisticated contract approval workflows to make sure high-risk edits don't slip past the relevant stakeholders. These approval workflows can be set based on the values in a contract, or as a sequence of approvers.
Best of all, all of the edits and changes made to a contract are captured in a secure, tamper-proof audit trail. This makes it easy to identify which changes were made to a contract, and when.
Modern businesses use Juro to automate contracts from drafting to signature and beyond, in an AI-enabled platform that every team can use. Want to see how?